


How To Remove Wallpaper Bubbles
By: Alyssa S.
Updated: August 20, 2024
Decorating with wallpaper is a fun way to give a room some design, and a relatively easy DIY project, but sometimes things go a bit awry. A common mishap with newly installed wallpaper is the formation of pesky wallpaper bubbles. Fret not! In just a few simple steps, you can easily fix your walls’ blemishes and your wallpaper will look fantastic.
What Causes Air Bubbles in Wallpaper?
Bubbles in wallpaper most often begin with wallpaper installation—specifically when wallpaper fails to properly bond with the wall surface. It can happen soon after installing the wallpaper or over time.
Another reason air bubbles can occur is not allowing the wallpaper panels to “book”. To book, paste must be applied onto the wallpaper panels, allowing it to absorb the adhesive and expand. If the “booking” time is insufficient, the wallcovering will expand on the wall, leading to the creation of air bubbles. Air bubbles in wallpaper may also indicate an imperfection in the wall surface, like dirt, paint chips, or holes.
By ensuring you have a clean and smooth wall surface and allowing sufficient “booking” time for wallpaper panels, you can prevent bubbling wallpaper from occurring. We recommend the following resting/"booking" times for our products:
- For materials that require the addition of paste (Eco Bella-Texture, EnviroPro-Texture, and Vinyl HD- Texture), allow about 10 minutes for booking
- For prepasted materials (Prepasted Wallpaper), book for 2 - 5 minutes
- For peel and stick material (SmartStick and VersaGrip), do not book panels - as they will stick to each other and you cannot separate them
Bubbles in peel and stick materials are largely due to not adequately applying the wallpaper and using a smoothing tool to smooth the wallpaper from the center to the edges. Smoothing tools push the air out from under the material. Air that is trapped between the walls and the material is what causes air bubbles in self adhesive materials.
How To Get Bubbles Out Of Wallpaper
Fortunately, wallpaper bubbles and blisters are easy to fix. To remove wallpaper bubbles, you will need the following:
- Razor Blade or X-acto Knife
- Sponge
- Tweezers
- Optional: Small Specialty Syringe (for reapplying paste)
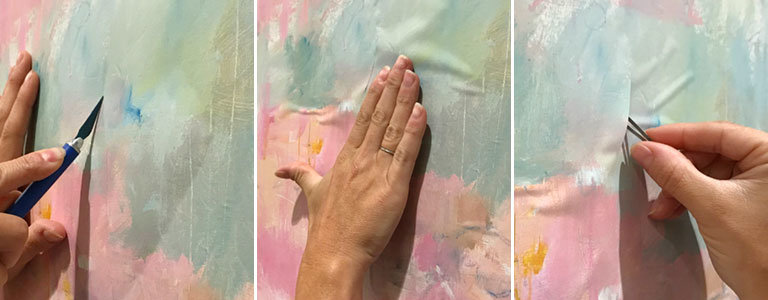
1. Cut the bubble
Using a razor blade or X-acto knife, make a small incision in the wallpaper bubble.
2. Push out air and remove any solid material
Gently press down on the bubble to get all the air out from underneath it. Use the tweezers to carefully open up the incision and remove any problem material (like dirt or paint chips) from inside the wallpaper bubble.

3. Use the syringe to apply adhesive
Load a syringe with wallpaper glue and insert it into the incision. Apply a generous amount of glue, but be careful to not oversaturate the area.
If you have just hung the wallpaper, press down on the bubble before applying more glue. If it does not hold, then use the syringe to add more.
4. Smooth Out the Bubble
Flatten the paper against the wall using light pressure. Smooth out the bubble with a damp sponge. Wipe off any excess glue and allow the wallpaper repair to dry.
Repeat this process on other wallpaper bubbles as necessary. Once completed, you can sit back and admire a job well done!
For more helpful how-tos and creative customer examples, sign up for our newsletter and receive weekly wall mural inspiration emails direct to your inbox.